In this post, we tackle a common issue that you can have when you use Azure VNET inside your organisation. When you have an Azure environment that grows organic every few weeks with new business applications and systems that you migrate from on-premises to the cloud, there is an all the time risk to end up with a wrong infrastructure topology.
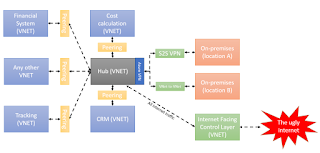
 The lack of best practices, templates and strategy can end up with a topology like this.
Overview
At first glance, things might not look so bad. Even so, if w analyse how things are done, we will notify easily that we have 8 different VPN gateways used for VNET-to-VNET communication (peering). Additional to this there are two different S2S VPN connection that needs to be managed from on-premises to be able to communicate with 2 different VNETs.
Things might be optimised a little. Even so, if we want to add a layer of security and control on top of it, we would realise that the current topology is hard to maintain and manage. UDR (User Defined Routes) needs to be defined in multiple locations to ensure that we have full control of the traffic. Besides this, if we want to add any virtual appliance for traffic management, control or audit it would be pretty complicated to do it without creating multiple appliances with the same purpose of to redirect traffic between multiple VNETs.
Putting any firewall in a central location to manage the traffic between all VNETs and public internet or on-premises it’s hard to set up because it would require to re-architecture the flow of packages between all VNETs.
If you ask yourself why we have multiple Site-to-Site VPN, it is because there is no default support for packages in transit cross VNET that are connected using peeing or VPN. It means that if both VNETs needs on-premises access, they would require custom UDR and virtual appliances or 2 different S2S VPN.
The current topology it’s like a spider canvas, that will grow and grow and would add extra complexity layer with each new system or VNET that would be attached to it.
How to use it
A solution for this problem is to do a re-architecture of the network topology and use gateway transit functionality that it is available inside Azure. In this way, we could have a VNET that plays the role of the hub for all connectivity between on-premises and the rest of the VNETs. The Hub can also become the central location where all the virtual appliances required to audit and security are deployed (e.g. firewall).
 Gateway Transit it is a functionality inside VNET peering that enables a VNET to use the VNET Gateway from a peered VNET for VNET-to-VNET communication. By default, a VNET cannot use another VNET Gateway as a jumper to reach another network.
Using this feature, we can communicate with on-premises and external networks without having to create multiple VPN connections with the same location. It can be used with success with any VPN connection (S2S VPN, P2S VPN and VNET-to-VNET).
In the backstage when we activate this feature, the routing table is propagated cross VNETs that are connected between each other enabling the package to reach the final destination.
It is interesting with you to combine this feature with UDR, NSG and virtual appliance configured at Hub level that plays the role of Firewall, Audit, DNS, Internet-facing point and another type of functionality. Very quickly you have a single point in your system that controls and manage your internal traffic. The network topology can be extended easily with green and red cable.
What we gain
After the redesign of the topology, the number of VMs needed for Virtual Appliances reduced drastically. Hand in hand the cost of different software licences that were running on the virtual appliances went drastically down. From 6 licences for Barracuda Firewall and 4 for HAProxy, we ended up with 2 licences of Barracuda Firewall and 2 for HaProxy. We could even reduce to one, but we wanted to have a failover node for each of them.
Additional to this the IT needs to configure all the security rules and restriction in only one location – inside the Hub. In our case, all the context flows to the Hub before reaching any other place from the internet or other networks.
 The downside of this approach is to reach the bandwidth and limitations of the VNET, but in most of the cases, this is not easy to reach, and there are multiple mitigation plans.
How to enable Gateway Transit
To activate the gateway transit functionality, you will need to do 2 things.
Price
There is no additional cost when you activate this feature. You pay the standard traffic cost that you usually pay.
Limits
The current limit of the no. of VNETs that can be peered together with a VNET is 100. This value is planned to be increased and covered most of the existing use cases that we have nowadays.
Conclusion
Gateway Transit it's a powerful feature that helps us to consolidate and enforce our network security and how we maintain and control the package flow.

Overview
At first glance, things might not look so bad. Even so, if w analyse how things are done, we will notify easily that we have 8 different VPN gateways used for VNET-to-VNET communication (peering). Additional to this there are two different S2S VPN connection that needs to be managed from on-premises to be able to communicate with 2 different VNETs.
Things might be optimised a little. Even so, if we want to add a layer of security and control on top of it, we would realise that the current topology is hard to maintain and manage. UDR (User Defined Routes) needs to be defined in multiple locations to ensure that we have full control of the traffic. Besides this, if we want to add any virtual appliance for traffic management, control or audit it would be pretty complicated to do it without creating multiple appliances with the same purpose of to redirect traffic between multiple VNETs.
Putting any firewall in a central location to manage the traffic between all VNETs and public internet or on-premises it’s hard to set up because it would require to re-architecture the flow of packages between all VNETs.
If you ask yourself why we have multiple Site-to-Site VPN, it is because there is no default support for packages in transit cross VNET that are connected using peeing or VPN. It means that if both VNETs needs on-premises access, they would require custom UDR and virtual appliances or 2 different S2S VPN.
The current topology it’s like a spider canvas, that will grow and grow and would add extra complexity layer with each new system or VNET that would be attached to it.
How to use it
A solution for this problem is to do a re-architecture of the network topology and use gateway transit functionality that it is available inside Azure. In this way, we could have a VNET that plays the role of the hub for all connectivity between on-premises and the rest of the VNETs. The Hub can also become the central location where all the virtual appliances required to audit and security are deployed (e.g. firewall).

Using this feature, we can communicate with on-premises and external networks without having to create multiple VPN connections with the same location. It can be used with success with any VPN connection (S2S VPN, P2S VPN and VNET-to-VNET).
In the backstage when we activate this feature, the routing table is propagated cross VNETs that are connected between each other enabling the package to reach the final destination.
It is interesting with you to combine this feature with UDR, NSG and virtual appliance configured at Hub level that plays the role of Firewall, Audit, DNS, Internet-facing point and another type of functionality. Very quickly you have a single point in your system that controls and manage your internal traffic. The network topology can be extended easily with green and red cable.
What we gain
After the redesign of the topology, the number of VMs needed for Virtual Appliances reduced drastically. Hand in hand the cost of different software licences that were running on the virtual appliances went drastically down. From 6 licences for Barracuda Firewall and 4 for HAProxy, we ended up with 2 licences of Barracuda Firewall and 2 for HaProxy. We could even reduce to one, but we wanted to have a failover node for each of them.
Additional to this the IT needs to configure all the security rules and restriction in only one location – inside the Hub. In our case, all the context flows to the Hub before reaching any other place from the internet or other networks.

How to enable Gateway Transit
To activate the gateway transit functionality, you will need to do 2 things.
- At the Hub, VNET level ensures that „Allow virtual networks access” is enabled and „Allow gateway transit” is checked.
- At the Spoke VNET level (the one that is using Hub to communicate with other networks), you need to check that “Allow virtual network access” is enabled and activate “Use Remote Gateways.” at all VNET that needs to use the Hub to communicate with other networks.
Price
There is no additional cost when you activate this feature. You pay the standard traffic cost that you usually pay.
Limits
The current limit of the no. of VNETs that can be peered together with a VNET is 100. This value is planned to be increased and covered most of the existing use cases that we have nowadays.
Conclusion
Gateway Transit it's a powerful feature that helps us to consolidate and enforce our network security and how we maintain and control the package flow.
Comments
Post a Comment